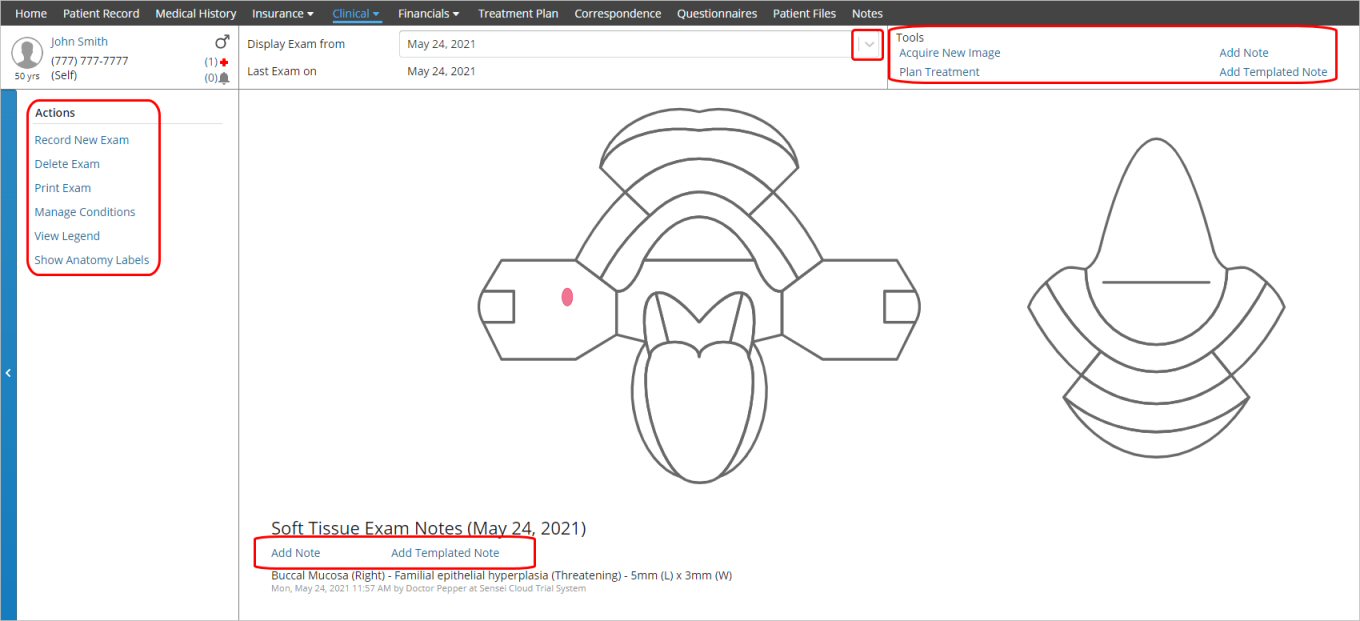
Use the Soft Tissue Chart to document findings from the clinical evaluation of the mouth, throat, tongue, and gums. A pre-populated list of soft tissue conditions is available for selection. You can chart abnormal conditions or diseases directly to the specific anatomical region, and each finding is visually represented in the graphical chart. A note containing the relevant details is added to the exam, and you can also create additional notes to further document your assessment.
You can also:
- View a patient’s existing exams by selecting the associated exam date in the banner.
- Edit or delete an exam.
- Print an exam, including the graphical chart and the list of findings and clinical notes.
- Manage (edit, delete, or add to) the list of soft tissue conditions available for selection.
- Acquire a new image to associate with an exam.
- Add a note or templated note.
- Plan treatment based on the documented findings.
To document a new soft tissue exam:
- Select Patient > Clinical > Soft Tissue Chart. The clinical window displays the date of the patient's last soft tissue exam, or a notice that no exams have been recorded for the patient.

Note: View previous exams by selecting an exam date in the Display Exam from field at the top of the window. - Click Record New Exam. The soft tissue chart is displayed.
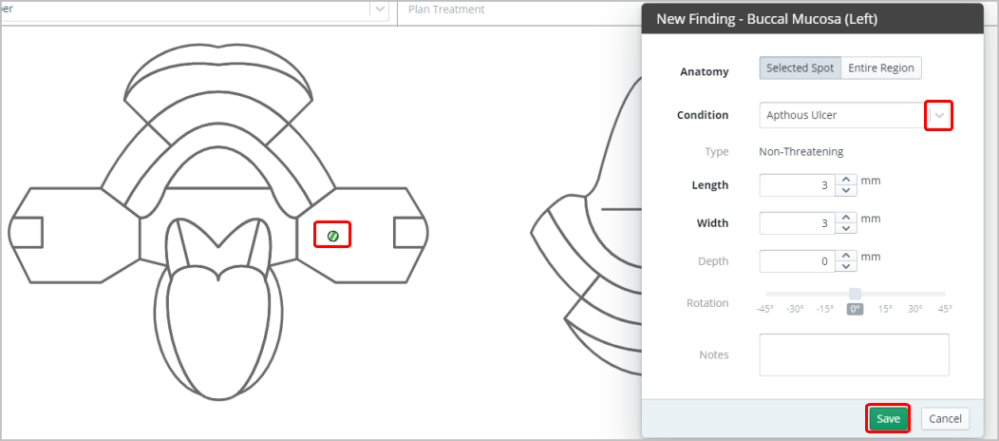
- Click within an anatomical region. The New Finding - (region) window is displayed.

- For Anatomy, choose Selected Spot or Entire Region.
- Select a condition from the list. The type (Threatening, Non-Threatening, Anomaly, Other, Unchartable) is displayed based on the selected condition.
- Use the additional fields to record measurements and rotation for a selected spot, and any additional notes for the selected condition.
- Click Save. A clinical note is created, and a graphical representation of the condition is displayed on the soft tissue chart in the appropriate color (green = non-threatening, pink = threatening, etc.).
Note: Click View Legend in the Actions panel for color definitions. - Repeat Steps 3-6 for any additional conditions you find.
- Click Save Exam.
Note: Only one new soft tissue exam can be recorded for a patient on a single date. If additional
findings need to be documented, select Edit Exam in the Actions panel.
Managing the List of Soft Tissue Conditions
Sensei Cloud is pre-populated with a list of soft tissue conditions that include type and a description. You can update the information for a condition or add new conditions to the list.
To update the list of soft tissue conditions:
- Select Patient > Clinical > Soft Tissue Chart.
- Under Actions, select Manage Conditions. The Manage Soft Tissue Exam Conditions window is displayed.
- Use the Search field to find a condition, or filter by Type.
- Click on a condition in the Name column (or click Create New at the bottom of the window). The Update Soft Tissue Exam Condition (or Create New Soft Tissue Exam Condition) window is displayed.
Note: Click Delete from the Update window if you want to remove a condition from the list. You are prompted to confirm. - Enter your changes and click Save. The Manage Soft Tissue Exam Conditions list is updated.
- When you have finished updating and adding conditions, click OK.
Note: If you modify a condition, the updates are reflected the next time it is used to record a soft tissue exam. Any existing patient exam data will remain intact.
Note: When creating a new condition, you must use a unique name.
Comments
0 comments
Please sign in to leave a comment.